
SMED in mold changes: reducing downtime and improving OEE
There is a highly recognizable moment in any plant: the line stops, the clock starts ticking, and suddenly, the “mold change” becomes the bottleneck that dictates production, maintenance, and quality. The good news is that SMED in mold changing is not just a Lean slogan: it is a highly practical way to reduce setup times, recover availability, and turn the changeover into a repeatable, measurable, and safe process.
Table of Contents
Why Mold Changes are Stealing Your Capacity
What is SMED and What Does “Single-Digit” Mean in Practice?
Before You Run: Define Scope, Safety, and the “First Good Piece”
Step-by-Step SMED Methodology Applied to Mold Changes
Capture the Current State (Warts and All)
Separate Internal vs. External (The #1 Lever)
Convert Internal to External (The #2 Lever)
Simplify and Accelerate Remaining Internal Tasks
Standardize to sustain; otherwise, you'll revert to "everyone doing it their own way"
Industrial Process Standardization: Making Your Standard "Shift-Proof"
Dedicated Tooling: The Silent Multiplier
Quick Fastening and “Shift-Proof” References
Mold Change Checklist: A 3-Phase Template
Pre-Changeover Checklist (External Setup, Before Shutdown)
During-Changeover Checklist (Internal Setup, Machine Stopped)
Startup and Release Checklist (Quality + Stability)
Metrics for Management: OEE and ROI
OEE: Why Changeovers Directly Impact Availability
Core KPIs for a Serious SMED Implementation (Keeping it Practical)
Simple ROI Example (For Decision-Making, Not Just Slide Decoration)
Typical Mistakes in SMED for Mold Changes (and How to Avoid Them)
When SMED is Not Enough: Signs You Need Redesign or Investment
Is SMED only for automotive, or does it apply to vibropresses and concrete molds?
What is the best "target time" for a mold change?
Which is more valuable: reducing minutes or reducing startup scrap?
How many people should participate in the changeover?
How do I prevent SMED from "fading" over time?
What should I standardize first: the process or the tooling?
Why Mold Changes are Stealing Your Capacity
A mold change is more than just “downtime.” It also involves imperfect startups (doubtful first pieces), micro-adjustments, waiting for cranes, searching for tools, doubts regarding tooling versions, and conflicting calls. This directly impacts two things that leadership truly cares about:
Real Capacity: Recovered productive hours.
Cost per Unit: Less scrap and fewer emergencies.
In block, paver, or precast plants—where you deal with product families, varying heights, textures, and campaigns—the mold change is often the invisible tax you pay for flexibility. At CBM, we see this frequently when plants operate in “firefighting mode” rather than following a standard.
What is SMED and What Does “Single-Digit” Mean in Practice?
SMED (Single-Minute Exchange of Die) is a methodology for switching references in the shortest time possible. It works by separating tasks that can only be done while the machine is stopped (Internal) from those that can be prepared while the machine is running (External), then converting internal tasks to external and simplifying the rest.
Furthermore, the “single-digit” objective refers to bringing the changeover time down to under 10 minutes—as a benchmark, not a dogma. This idea, applied to mold changes, translates into an uncomfortable (yet powerful) question:
“Which part of the changeover am I doing late… just out of habit?”
Before You Run: Define Scope, Safety, and the “First Good Piece”
Before optimizing, you need clear rules of the game. Otherwise, you’ll be comparing apples to oranges, and any improvement will be debated rather than sustained.
Define the Start and End of the Changeover:
Typical Start: Last OK piece of the previous batch / Planned stop.
Recommended End: First stable OK piece (not just “when it’s mounted”). This prevents “false improvements” that merely shift the problem to the startup phase.
Safety: Fast Change is Not Reckless Change
Any intervention involving hazardous energy (electrical, hydraulic, pneumatic, mechanical, gravity) requires control and procedure. The OSHA Lockout/Tagout (LOTO) standard makes it clear: the goal is to prevent unexpected energization or the release of stored energy during service.
Plant Translation: If your SMED “saves minutes” by skipping critical steps, you are buying risk.
Define Roles and Responsibilities:
Operations, maintenance, quality, and logistics must know what they are doing, when, and what signal triggers the hand-off. An SMED without roles becomes “everyone helps,” which sounds good… until nobody takes ownership.
Step-by-Step SMED Methodology Applied to Mold Changes
This is where SMED becomes actionable. It doesn’t start by buying equipment; it starts by looking at the changeover through the lens of a process.
Capture the Current State (Warts and All)
Record the changeover (video), time the activities, and note the waiting times. The goal is not to blame; it is to see: tool searching, back-and-forth trips, repeated adjustments, version doubts, waiting for overhead cranes, and improvised cleaning.
Practical Tip: Divide the changeover into blocks (Safety/Isolation, Dismantling, Transfer, Assembly, Connections, Adjustments, Validation).
Separate Internal vs. External (The #1 Lever)
Create two lists:
Internal: Tasks requiring the machine to stop (e.g., physical removal/placement of the mold).
External: Tasks you can ready beforehand (tools, spare parts, presets, cleaning, reference verification, peripheral preparation). At this stage, “external tasks disguised as internal” usually appear: bringing tools, looking for bolts, preparing shims, confirming recipes, or locating the correct insert.
Convert Internal to External (The #2 Lever)
Typical examples for mold changes:
Off-line Presets: Heights, stops, references, and consumables.
Kitting: A closed kit per format (bolts, connectors, seals, shims, special tools).
Pre-positioning: Mold ready on a cart, correctly oriented, lifting points verified, and the route cleared.
Visual Documentation: Photo of the correct assembly + current version.
Simplify and Accelerate Remaining Internal Tasks
This is where process design improvements come in: fewer bolts, quick-release fasteners, centering guides, quick connectors, parallel operations, and the elimination of repeated adjustments.
Standardize to sustain; otherwise, you'll revert to "everyone doing it their own way"
Standardize to Sustain:
SMED “works” when the new method is converted into:
Work Standard (Sequence).
Material Standard (Which kit).
Quality Standard (What to check).
Measurement Standard (Which KPI rules).
 and cost per unit (less scrap and fewer emergencies) in block, paver, and precast plants. Introduces SMED (Single-Minute Exchange of Die) and the “single-digit” benchmark (<10 minutes) as a reference, not a dogma. Emphasizes defining clear start and end points using the first stable OK piece, enforcing safety through LOTO procedures, and assigning clear roles across operations, maintenance, quality, and logistics. Describes the step-by-step SMED approach: capturing the current state with video and timing, splitting tasks into internal and external, converting internal to external through presets, kitting, pre-positioning, and visual documentation, simplifying remaining internal work, and sustaining gains through standardized work, materials, quality checks, and KPIs.")
Industrial Process Standardization: Making Your Standard "Shift-Proof"
Standardization is not bureaucracy; it is what prevents your best changeover from depending on “Operator A.” A solid mold change standard usually includes:
Single Sequence (Numbered steps, not paragraphs).
Target Time per Block (Not just total time).
Critical Points (Tightening torque, references, connections, surface cleaning).
Release Criteria (First OK piece + tolerances).
Escalation Rules (When to stop and ask for help).
If you are working on a broader improvement project, it is useful to align this standard with your plant roadmap. The technical guide for factory managers on modernization emphasizes measuring OEE, scrap, and mold changeover times as core KPIs for prioritizing investments.
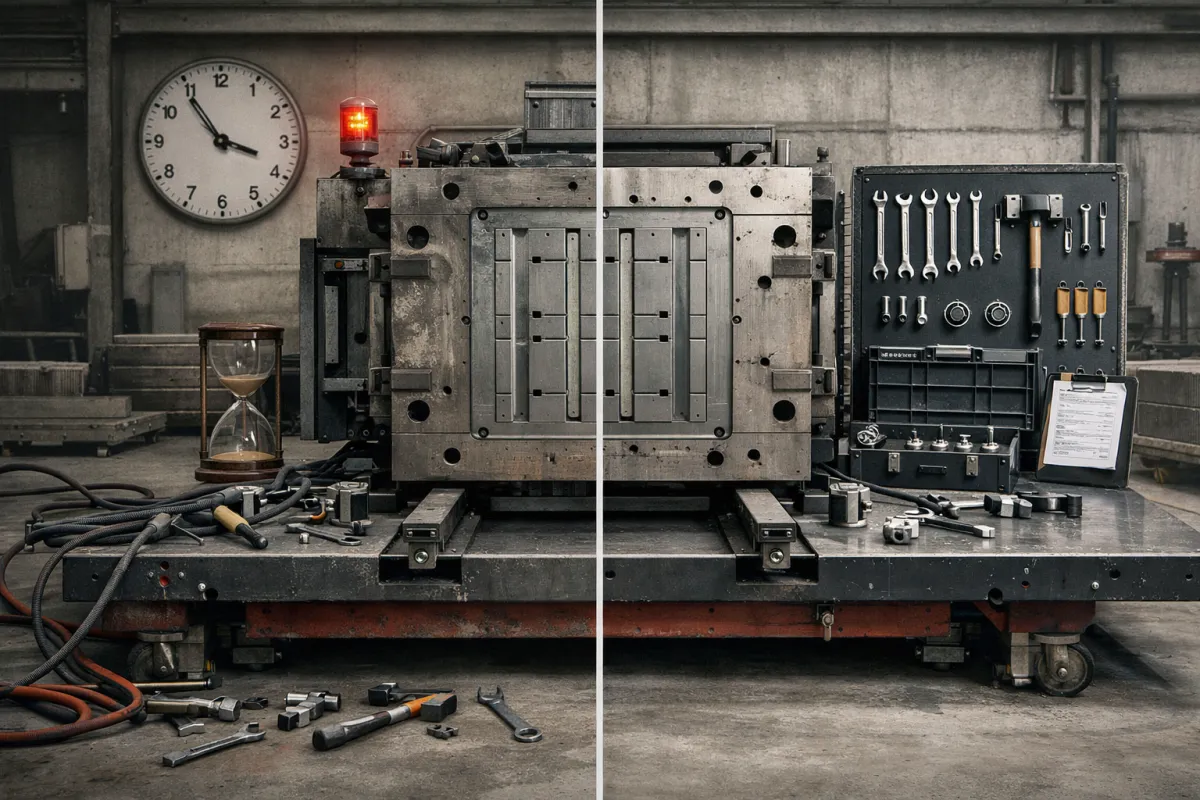
Dedicated Tooling: The Silent Multiplier
SMED doesn’t always require CAPEX, but it does require method. When you do need hardware, the ROI comes from “small things” that eliminate adjustments and waiting.
Change Carts + Shadow Boards
A dedicated cart per line (or family) containing:
Specific wrenches and tools.
Torque wrenches.
Consumables (cleaning, lubrication, seals).
Gauges and references.
Laminated checklist.
Critical “startup” spares. This eliminates the most common waste: walking and searching.
Quick Fastening and “Shift-Proof” References
Repeatable mechanical stops.
Centering pins.
Quick-clamping systems where applicable.
Visual position markings.
Quick Connects: Hydraulic/pneumatic lines with clear ID, standardized connectors, and accessible connection points.
Mold Change Checklist: A 3-Phase Template
A good checklist is not an infinite list; it’s a short script that prevents expensive errors.
Pre-Changeover Checklist (External Setup, Before Shutdown)
Context: This phase offers the highest "ROI" for improvement because it is performed while the line is still running (Zero downtime impact).
Correct mold verified: (Code, version, family).
Complete changeover kit: (Fasteners, shims, seals, special tools).
Surfaces cleaned and inspected: (No concrete buildup / visible wear).
Lifting equipment verified: (Lifting points, slings, load capacity).
Pathway cleared + transport cart in position.
Parameters/Recipe ready: (Current/updated documentation).
Quality alignment: First-piece criteria OK.
During-Changeover Checklist (Internal Setup, Machine Stopped)
Focus: Safety and repeatability.
LOTO/Safety isolation: Performed according to procedure.
Former mold removal: Without damage (critical points protected).
Quick cleaning: Seating surfaces and reference points.
New mold installation: Following the standard sequence.
Connections (Hydraulic/Pneumatic): Correct and verified.
Torque settings: Applied to critical points.
Centering and alignment: Confirmed.
Startup and Release Checklist (Quality + Stability)
Context: This is the most frequently overlooked stage, often resulting in high scrap rates later.
Controlled startup: (No rushing).
First piece: Dimensional and visual inspection per standard.
Permissible adjustments: (Maximum X, documented).
Downtime log: Total time record + incidents (root causes of loss).
Formal release: “OK for stable production.”
Pro-Tip: To strengthen the preventive approach (essential for SMED), it is highly beneficial to integrate preventive maintenance habits for concrete machinery, specifically focusing on cleaning, lubrication, and mold condition audits.
, release criteria based on the first OK piece and tolerances, and clear escalation rules. Links the standard to broader plant improvement by referencing core KPIs such as OEE, scrap, and mold changeover time to prioritize investments. Explains dedicated tooling as a key SMED multiplier: change carts and shadow boards stocked with specific tools, torque wrenches, consumables, gauges, a laminated checklist, and critical startup spares to eliminate walking and searching. Highlights quick fastening and repeatable, “shift-proof” references (mechanical stops, centering pins, quick clamps, visual markings) plus standardized quick-connects for hydraulic/pneumatic lines. Provides a practical 3-phase mold change checklist: pre-changeover external setup (verify mold, kit, cleanliness, lifting gear, cleared path, recipe, and quality criteria), during-changeover internal steps (LOTO, safe removal, quick cleaning, standard install, verified connections, torque, alignment), and startup/release controls (first-piece inspection, adjustment limits, downtime/incidents log, and formal OK for stable production).")
Metrics for Management: OEE and ROI
If you want SMED to survive, it needs a dashboard that speaks the language of the business.
OEE: Why Changeovers Directly Impact Availability
OEE is built on Availability, Performance, and Quality; it is calculated as the product of these three components.
Mold changeovers directly impact Availability (planned time the machine is not producing) and, if the startup is "dirty," they also affect Quality (setup-related scrap).
Core KPIs for a Serious SMED Implementation (Keeping it Practical)
Total Changeover Time: (Until the "First Piece OK").
Internal vs. External Time: (And the % of externalization).
Variability: (It is better to have 18±2 min than "sometimes 10, sometimes 40").
Startup Scrap: (Pieces or time lost).
Post-changeover Micro-stops: (During the first 2 hours).
Loss Causes: (Top 3 via Pareto analysis).
To align definitions and avoid debates (“Does this count or not?”), it is useful to rely on recognized KPI frameworks. ISO 22400 defines KPIs for manufacturing operations management with specific formulas and characteristics, ensuring indicators are comparable and governable.
Simple ROI Example (For Decision-Making, Not Just Slide Decoration)
Imagine a scenario where you perform 5 changeovers per day, and each changeover is reduced from 45 min to 20 min:
Minutes recovered per day: (45–20) × 5 = 125 min/day.
If you produce 2 pallets every 10 min, you recover approximately 25 pallets/day.
Multiply this by the unit margin or the hourly downtime cost: that is your baseline ROI.
Then, adjust for: reduced startup scrap, fewer emergencies, less overtime, and reduced pressure on the shift. Furthermore, if the bottleneck is at the end of the line, freeing up capacity with SMED can allow an automation project (e.g., palletizing) to be integrated without oversaturating the system.
In fact, technical guides for automated palletizing with proven ROI emphasize sizing buffers and stabilizing flow so that improvements are measurable with a verifiable return.
Typical Mistakes in SMED for Mold Changes (and How to Avoid Them)
Measuring only "assembly" and not "first piece OK": Leads to false improvements.
Not separating Internal/External tasks: Resulting in forced, unsafe acceleration.
Lack of Kitting: The changeover depends on memory and luck.
Non-standard tooling: Buying "things" without changing habits.
Lack of Version Control: (Molds/inserts/recipes) leading to endless fine-tuning.
Failure to close the data loop: The process eventually degrades back to old habits.
When SMED is Not Enough: Signs You Need Redesign or Investment
Sometimes the limit isn't the method, but the physics:
Extremely heavy molds with complex maneuvers.
Inaccessible interfaces.
Too many fastening points.
Inevitable fine-tuning required by design.
Lack of mechanical repeatability.
In these cases, SMED will highlight "where it hurts." Usually, the solution involves dedicated tooling, interface redesign, and occasionally, equipment modernization.
If you are in this phase, it makes sense to address it within a comprehensive capacity, quality, and safety plan, as we do in our services for the concrete industry when the goal is a measurable return and controlled risk.
FAQs to Save You Meetings
Is SMED only for automotive, or does it apply to vibropresses and concrete molds?
It applies perfectly. The original "die" was for stamping, but the principle is universal: separate internal/external, convert, simplify, and standardize.
What is the best "target time" for a mold change?
The one that allows you to meet demand with stability. "Under 10 minutes" is a benchmark, but prioritize repeatability and reducing variability first.
Which is more valuable: reducing minutes or reducing startup scrap?
Both, but scrap often hides more costs than it appears. A fast changeover with a poor startup results in quality losses and micro-stops.
How many people should participate in the changeover?
It depends on risk and design. SMED doesn't mean "more hands"; it means "better choreography": clear roles, parallel operations where safe, and a stable standard.
How do I prevent SMED from "fading" over time?
Lightweight weekly audits, visible metrics, version control, and training. Without governance, every shift will start doing it differently.
What should I standardize first: the process or the tooling?
The process. Tooling without a standard process only accelerates the chaos.
From Mold Change to "Industrial Pit Stop": Your Next Step
If you want SMED in mold changes to return real hours (and not just a "feeling of improvement"), follow this sequence: Measure accurately → Separate Internal/External → Prepare with Kitting → Simplify with dedicated tooling → Standardize → Govern with metrics.
This is what converts setup time reduction into sustained ROI and OEE improvement through SMED.
If you would like to discuss your specific case, we invite you to contact us and start building a quality system that lives up to your blocks:
👉 Fill out our form for an initial technical assessment.
👉 Request a quote and a phased plan from CBM Experts to optimize your end of line without stopping the plant.

